
Set-up, we call it the black art of motorcycle road racing. The all-important ability to set up your motorcycles chassis and suspension to make that motorcycle the best weapon available come race day. A combination of motorcycle and rider that will help you defeat your opponents.
It is all well and good being the best rider on this planet, however, in modern-day motorcycle racing and achieving a MotoGP ride, it’s just not enough to pin your hopes on. The modern day motorcycle racer requires a broad skill-set for the most sophisticated of all modern sports. The skill-set includes on-bike rider skills, physical and mental skills as well as management, and bike set-up skills!
Check out all our tech tips here…
The degree of how well you can set-up your bike is measured by a lap time, as well as a race distance time. Qualifying works on a single fast lap for placement of starting position. Race distance time is taken from the start to the finish of the race. How well we set up our motorcycle to stave off tyre degradation and rider fatigue is all about having the best condition tyre in the last and closing laps so you can destroy your opposition and take that chequered flag!
All too often we see a rider that can qualify well yet they suffer in the race, all because they don’t have a suitable race set-up that will go the full race distance and allow them to be as competitive at the end of a race as they were at the start.
TRADE-OFFS
The reason that the name ‘the black art’ is given to what we call the knowledge of suspension and chassis set-up is because there are so many different options available to the rider and his team of technicians. The most important part of a set-up session is to understand that whilst we make a change in one aspect of the motorcycle, we may affect the performance of the motorcycle in other areas.
A harder spring may be fitted but this requires hydraulic adjustments and the ride height may have been affected so then a chassis adjustment may be required.
Sometimes we may even move in the wrong direction. Simply, we make an adjustment with back to back testing that appears to be working and it is not until we have moved a full circle with testing that we realise we were on the wrong track. More than likely the initial adjustments masked the initial problem, meaning the adjustment did not fix the problem but just helped the symptom. There is a defining need to be flexible and commit to doing a full testing package away from a race meeting where you have time to concentrate on testing in a suitable environment.
When we adjust suspension we can affect the geometry of the motorcycle both front and rear. Likewise, when we adjust geometry we affect suspension settings, it is imperative we have a good understanding of adjustments and all the trade-offs, before we really get started in the set-up of a motorcycle’s chassis and suspension.
Modern-day motorcycle racers are well aware of the above points. The black art of set-up is really what puts the pressure on the individual riders and their teams come race weekend. The race organisers have realised this as well. In fact, most race series organisers limit test sessions in a competition year in a bid to keep a level playing field for all competitors.
BACK-TO-BACK TESTING
An essential part of setting up your motorcycle is to ensure that you are going about the research and development of your motorcycle in the correct manner. A systematic testing program that takes in a holistic approach is essential.
Try to test under the exact same riding conditions as this will help to ensure that when we are making changes to the set-up they are relevant to the last test or race conditions. Being able to test back to back in similar conditions takes a lot of guesswork out.
It’s hard enough to work through the black art of chassis and suspension set-up but when you have to consider the effects of changing weather conditions, you can just imagine how lost you can get when you don’t consider the effects of all areas.
“Making assumptions in testing is the mother of all mistakes. Remember, the changes are so small for huge gains especially when you start to get on top.”
Making assumptions in testing is the mother of all mistakes. Remember, the changes are so small for huge gains especially when you start to get on top of your game. The faster you are, the smaller and more subtle are the changes that give you huge advantages, especially when the final measurement of all your work is in the last or closing laps.
RECORDING INFORMATION
To record information you will need an appropriate set-up sheet with all the details of the test. Conditions of the track surface including surface temperature, number of turns, length, undulations, height above sea level and obviously the track name all need to be recorded accurately. Weather conditions the test was run under, wind direction and strength, humidity, temp and air density of each test session.

Chassis set-up needs to be recorded as well including front and rear ride heights, position of rear wheel and front and rear sprocket sizes. Make note of suspension settings including front and rear spring rate and preload. Also record hydraulic adjustments such as fluid levels, compression and rebound settings.
Brand of tyres and exact model info including sizes, compound, rolling diameter, and crown radius. In the engine section you need to keep track of oils, fuel, and any modifications likely to effect performance. Finally, lap times must be recorded accurately and specify the type of testing, eg single lap or simulated 10 lap race including total race time.
MAINTENANCE OF YOUR MOTORCYCLE
Incorrectly adjusted, lubricated or worn items like wheel, steering head, swing arm, shock absorber and pivot bearings, or chain and sprockets, will all negatively effect the feel and performance of the suspension and chassis.
I have a maintenance sheet that allows my customers to personally go through and check their own motorcycle. I suggest that you get one organised and ensure that your motorcycle is in peak condition. Going through this checklist after every ride will enable you to identify any possible faults. Why after every ride? Management like this will give you enough time to order parts and organise workshop time.
GEOMETRY OF BIKE
In Australia we are lucky to have one of the world’s best measurement devices for a bike’s overall geometry set-up. The inventor has found a set of what he refers to as ‘sweet numbers’ that will clearly determine where adjustments are required to get the motorcycle’s geometry optimised.
I insist on all of my elite people in the sport having their machine put through the GMD Computrack system to ensure that the chassis is straight as well as finding a starting point to have the bike in the closest position to perfection for competition.
RAKE AND TRAIL
A lot of riders and mechanics make adjustments in a range of areas that affect the rake and trail of a motorcycle yet most are totally unaware of the full effects of their changes. When you look at the rake and trail diagram, you will see how we measure both. If you think a little more about all of the tuning options, you can see how adjustments will change the rake and trail of a motorcycle.
The adjustments therefore effect how quickly or slowly the motorcycle will turn, move the centre of gravity, and affect the motorcycle’s amount of mechanical grip. The effects are not just in how the motorcycle turns but also how the motorcycle brakes and its overall stability as well.

All too often the general motorcycle public are fooled into believing that grip is all about how we shift weight to the front and rear to create grip using mechanical tuning as in ride height. When we consider mechanical grip, we can increase or decrease grip, not by moving weight forward or rearwards but by adjustments in the rake and trail and swingarm angle to create mechanical grip.
FRONT AND REAR RIDE HEIGHT ADJUSTMENT
We can adjust the ride height of the front of the motorcycle by simply moving the forks through the triple clamps. The adjustment of the spring preload to a softer or harder setting, or changing of the spring rate, will also change the ride height.
The hydraulic settings available (as in oil-level height, amount of compression and rebound adjustment) will also affect the front ride height of the motorcycle!
The rear ride height can be adjusted by lengthening the shock absorber, changing a ride height adjustor or the geometry of linkages. All have tradeoffs. It’s very important to remember that just by adjusting your chain you can change your rear ride height and also the trail and rake at the front of the motorcycle!
ADJUSTABLE TRIPLE CLAMPS
Front triple-clamps are a very important chassis tuning device that is available to the motorcyclist when we want a particular characteristic tuned in or out by changing our motorcycle’s rake and trail which affects the amount of front grip, and how the bike turns as well as stability. Changing the offset of the triple-clamps does this.

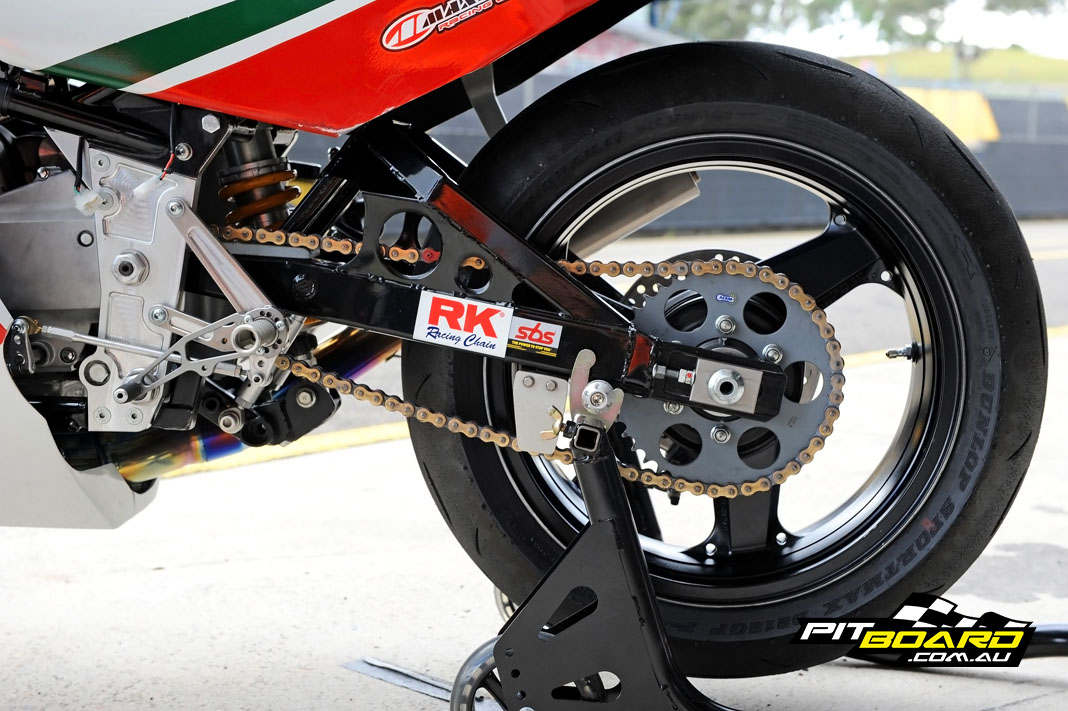
REAR WHEEL POSITION
The position of the rear wheel is so important to quite few areas of the motorcycle. We have the wheelbase to consider; in basic terms we can shorten and lengthen the wheelbase. Obviously this becomes a vital part of servicing the chain on the motorcycle. As it stretches and the wheel is moved back to maintain correct tension, the wheelbase is lengthened
When we adjust a chain, depending on the motorcycle swingarm design, we can increase the rear ride height and even in some cases decrease the ride height, which again will change the rake and trail of the front of the motorcycle.
The worst cases happened to be the single-sided swingarms that came on some of the endurance style racers, in particular, the VFR and RVF Hondas as well as a few of the NSR and RS250 Hondas. These bikes have an eccentric adjustment in the rear hub to adjust the chain. Unfortunately while the rear wheel looks very clean and stylish and allows for quick wheel changes, this adjustment changes the rear ride height.
Even a conventional swingarm can change the ride height. Check out your bike and work out whether the rear wheel moving back or forward works on a horizontal plane or an angle. This is very simple, if it’s not parallel to the ground then moving the rear wheel forward or rearwards will change the ride height, which again will change the front rake and trail.
CHAIN PULL SQUAT
The chain pull effect comes into effect when we accelerate the bike and is the action of the front sprocket pulling the swingarm around its pivot. This obviously affects the rear ride height as well as the rake and trail.
Adjustment can be made in a few areas. The size of the front sprocket will change the angle of the pulling chain as will the size of the rear sprocket. The position of the swingarm pivot will also affect the pull of the swing arm.
The goal would be to have the swingarm and front drive sprocket sharing the same pivot point centre.
Another change can be made through the lower control arm linkages on the swing arm. This affects the rate of pull on the rear shock, which can change the rear ride height. When you consider this in detail, changing gear ratios will have an effect on your chassis set-up not just make a change in the way the power is delivered.
SUSPENSION
The job of the suspension is to help keep the tyres in contact with the road to offer the best grip whilst cornering or braking. Let’s face it; it’s all about grip. Obviously in this process the suspension is soaking up all the bumps expected and unexpected, whilst keeping that perfect contact patch on the road.
SPRINGS
The job of the front and rear spring is essentially to take the weight of the rider and motorcycle. Given that the motorcycle weight is what it is, the variable will be the rider. As the weight of the rider increases, the need for a heavier spring to deal with the extra weight is required.
To get the full advantage from our spring we need the spring to be able to offer its total amount of free travel, which means that there is a certain amount of pre-load available on a spring before its available range of movement is affected.
All too often we see people run way too much spring pre-load, meaning that when the spring is put to work the energy in the spring is not allowed to fully dissipate on its return, which means the spring starts an oscillation cycle.
So the first step is to establish what spring would be suitable for your bike and rider setup. How do we know what spring to run? By having the knowledge of the rear shock’s total travel and working on the fact that the riders weight should never take up more than one third of travel when static. We also have a certain amount of spring preload available for each weight spring. With these two measurements we are able to establish what spring is required and what you want.
HYDRAULICS
The job of the hydraulics is to help the spring do its job of absorbing the bumps and uneven surfaces, whilst keeping the motorcycle on its original line or horizontal plane. As a child I was lucky to have a pogo stick. This was basically a stick with a big spring and two footrests on it and all you had to do was bounce around on it. Funnily enough, when we were young lads riding, if the bike didn’t have enough rebound dampening we used to say the back or front of the bike was like a pogo stick to ride. We have moved on and most kids would rather play on the computer, but you know it was a great way to understand why we need rebound dampening. The effect of not having rebound dampening would see us getting sprung all over the place.
Rebound dampening is the hydraulic action that slows the spring to its original position ready for the next bump in the road. Without rebound dampening what we would experience is a bouncing effect. If the rebound action is too fast we get a similar feeling just like a pogo stick. If the rebound action is too slow the spring will not return to its full length ready to do its job again. This is also known as ‘packing down’.
So what is compression dampening? Well, it works in the opposing direction to rebound dampening and assists the motorcycle under braking as well as reducing the effects of squat and acceleration. The adjustments of the above can be made with the clickers on the bike, however, once we start changing front or rear springs we also change the speed of the shock absorber and this is when we need to also change the valving of the hydraulics.

HIGH SPEED AND LOW SPEED REBOUND AND COMPRESSION ADJUSTMENTS
Sounds incredibly difficult all this high and low speed adjustment stuff but it’s fairly simple. Our modern day valving and hydraulic systems have become so sophisticated. In the expensive aftermarket shock absorbers we have the option to not only adjust the rebound and compression using on-bike clickers, we now have the ability to adjust rebound or compression in two areas. Rebound adjustment can be adjusted for the harsh and fast bumps. We use high-speed adjustment for those big bumps, while also having the ability to adjust low speed rebound for smooth bumps or acceleration-related rebound issues.
Likewise with compression adjustment we have the same scope of adjustment, which is great for adjustment under brakes or deceleration over a set of bumps with squat to the rear. Yes I know, just when you thought you were getting it!
GRIP
One of the most important rules to understand with your suspension settings for both spring and hydraulics is that the harder (or firmer) you make your suspension, the less feel (or feedback) you will have for surface grip.
The fine-line in tuning the suspension is to get the bike so it can cut a lap on the track, be predictable, offer great feel and be positive the harder you push it. Obviously the harder you push and the faster you go, the more you need to tune the suspension. To find the appropriate setting we must be constantly pushing the limits and improving yourself and the motorcycle. Also don’t forget, we should consider the effects of any chassis changes likely to affect our mechanical grip.
SUSPENSION GURUS
Our modern day racers have a range of technicians surrounding them. The suspension technician’s job is to ensure that not only has the rider got the correct springs for the job, but that the hydraulics are operating in the correct window of adjustment. The suspension gurus will also look at track conditions and offer even finer tuning advice to suit a high or low speed circuit to obtain an advantage that other riders may not have.
Not all riders use the same style, which means that not all suspensions are set the same. Riders prefer different settings to others and obviously every rider is a different weight and shape. However, it is interesting to note that although riders have different track preferences, they all have strengths and weaknesses, and the rider that comes with the most competitive package wins. Who is the best rider in the world at a top level? It’s the argument fought every weekend at tracks all around the world. But you can be assured of one thing in the modern-day racing world, it is no longer just about the rider, it’s definitely about the whole team and their ability to work together, searching for the ultimate performance of their motorcycle and rider. For me, it’s all about great feedback and feeling from a motorcycle that should feel like a physical extension of you.
Suspension Set-up Check List
- Step 1 Ensure that everything is serviced correctly, i.e. lubrication and adjustment to all bearings and pivot points.
- Step 2 Get your bike to GMD Computrack to make sure it’s straight and within the right range of sweet numbers and has the right springs and valving to suit.
- Step 4 Get yourself organised with a check sheet and some record of the adjustments you are about to make.
- Step 5 Log all information before you start the day’s testing, that way if it turns to shit you can backtrack.
- Step 6 Start your test day with all the confidence you possess and be ready to evaluate and make changes.
- Step 7 Don’t be scared of enlisting expert help, there are suspension gurus out there.
- Step 8 Remember that the test is not just about one lap but the best set-up for race distance.
- Step 9 You will never be happy with your set-up, you should always be ready to push for faster, better and quicker.
